|
|
9.10 TOS Card 2.06
TOS 2.06 im Atari ST/STe/MegaST
Ehemals von Hard & Soft Herberg vertrieben gab es die sog. TOS
Card. Diese Karte ermöglicht es Computer der ST-Serie 260/520,
den 1040ST und den MEGA ST mit dem neueren TOS 2.06 aufzurüsten.
Ältere TOS Releases (TOS 1.4) hat einen Umfang von 192Kb im
ROM. TOS 2.06 benötigt zwei ROMs/Eproms vom Typ 27C256. Ebenso
hat dieses neue TOS eine andere Adresslage als ältere Ausgaben,
es kann also nicht ohne weiteres in den Computer eingesteckt werden.
Bei TOS 1.0 - 1.4 befindet sich im Bereich: $FC0000 bis $FEFFF
Es ist eine kleine Hardware nötig um die Adresslage
anzupassen. Ohne Anpassung erzeugt der GLUE sofort einen Adresserror
Daher befinden sich die Sockel für TOS 2.06 auf einer Platine die idR auf die eingebaute 68000 CPU aufgesteckt wurde. Hierzu kann man einen passenden Sockel auf diese CPU löten, oder die CPU gleich ganz aus dem Rechner entfernen um dort einen Sockel für beides Einzulöten. Gelötet werde muß daher in allen Fällen
Lediglich bei MEGA ST bestand die Möglichkeit die Card ohne
löten einzubauen. Hierzu wäre allerdings noch die sog.
'Speed-Brigde' nötig die in den internen MEGA ST Port gesteckt
wird um die TOS Card aufzunehmen
Wenn Sie den 64 poligen DIL-Sockel auf die CPU auflöten
wollen sollten Sie darauf achten das die Kerbe im Sockel mit der
gleichen Markierung der CPU übereinstimmt, das hilft bei der
Orientierung später ungemein. Verlöten Sie zuerst die Pin an
den vier Ecken der 68000 CPU. Kurze Lötzeiten beachten!
Für den "Mega-Bus" gab es auch TOS 2.06 Karten die
dort eingesteckt wurden. Ein mir nicht bekannter Hesteller hatte die
kleine, unten gezeigte Platine mit Aufdruck ADS und dem Atari-Fuji.
Die Karte besitzt einen Stecker für den Mega-Bus. Darauf befindet
sich ansonsten nur ein Gal, eine quadratischer TOS-Chip und ein
Kondensator.
--------------------------------------------
|   (nach unten Mega-Bus-Stecker)          |
--------------------------------------------
|         -------                          |
|         | TOS |    ------------      --o |
| o--|--| |     |    | GAL      |      --o |
|    | C| |     |    ------------      --o |
| f-+|--| -------                          |
--------------------------------------------
wobei -o größere verzinnte Lötaugen sind und -f
eine verzinnte Lötfläche (+ des C's) darstellen. Diese
Erweiterung arbeitet nicht in dem man sie einfach in den MegaST Bus
steckt. Es muß auf das auf der Hauptplatine befindliche TOS
ausgeschaltet werden. Dazu gibt es die freien Lötaugen auf dieser
Platine.
Wenn jemand die Verkablung bekannt ist sollte er mir diese senden
damit ich sie hier nachliefern kann.
Die TOS Card wird 1:1 auf den CPU-Sockel gesteckt und
gleichmässig leicht in den Sockel gedrückt bis Widerstand
spürbar ist. Achten Sie darauf das sich alle Pin der TOS Card im
entsprechenden 'Loch' des CPU-Sockels befindet!
Weiterhin sind noch eine Drahtverbindungen herzustellen
Befindet sich das TOS in nur zwei ROMs, verfahren Sie mit beiden
ROMs so
Verbinden Sie nun Pin 'IN' der TOS Card mit Pin 20 (CE) an einem
der Sockel
SEL ---------------
                   \ Schalter
SEL ---------------
Mit dem Schalter wechseln Sie später von TOS 2.06 auf ihre
alte TOS Release oder eben umgekehrt. Beachten Sie bitte das die
Umschaltun nicht im Betrieb erfolgen kann. Der Rechner stürzt
dabei ganz sicher immer ab!
Verbinden Sie +5 der TOS Card mit einer beliebigen +5 Stelle im
Computer. GND verbinden Sie mit GND des Rechners. Benutzen Sie dazu
ein Voltmeter!
Abbildung 1 - TOS 2.06 Card
Z.B ist +5 Volt an Pin 14 der 68000 CPU vorhanden. GND finden Sie
an Pin 16 oder Pin 53. Der Einbau ist ansonsten eigentlich Unkritisch
und kann von jedem vorgenommen werden der sich ein wenig auskennt.
Eine Bezugsquelle für diese nette Karte ist mir leider nicht
bekannt. Eventuell noch bei Hard & Soft Herberg in Castrop Rauxel.
Nach dem Einschalten sollte sich ein umgebauter Atari wie gewohnt
melden, entweder mit dem neuen Atari-Logo und einem beginnenden
RAM-Test, oder wie gehabt, mit dem alten TOS welches vorher vorhanden
war. Das ist von der Schalterstellung abhänging.
"Artifex" war ein anderer Hersteller einer
"TOS-Karte". Der Einbau selbiger weicht nur wenig von der
Hard & Soft Karte ab. Die Artifex Karten gab es in mehreren
Ausführungen für die unterschiedlichen Atari Computer.
Bei der Artifex-Karte müssen die beiden TOS-ROMs, als
Beispiel des Einbaus in einen MegaST, aus den Sockeln U10 und U9
entfernt werden. Danach wird das Flachbandkabel mit dem EPROM-Sockel
in U9 (es steht auch HI-0 neben dem Sockel) gesteckt, und zwar so,
daß das Kabel zur CPU zeigt. Der Rest des Kabels wird in den
Megabus gesteckt. Das war alles. Die Karte sollte so in Betrieb
genommen werden können. Nach dem Einschalten muß sich der
MegaST mit dem TOS 2.06 melden.
Sollte sich herausstellen das eine TOS Karte falsch herrum auf der
CPU steckt brauchen Sie nicht weiter zu probieren. Die neuen ROMs und
die Logik der TOS Card sind sehr warscheinlich irreparabel
beschädigt.
Wenn an ihrem Atari ein HD-Diskettenlaufwerk angeschlossen ist
benötigen Sie HD_SET.PRG im Autoorder um die neuen Features
nutzen zu können. Die Steprate dieser Laufwerke sollte auf 6mS
eingestellt werden.
I just purchased a TOS Extension Card from Germany so the manual
is in German (of course). Ive looked on google for some help but
nothing has ever been posted about the single wire that comes the chip
on the card. Can some one please tell me where this wire goes? It has
a gold pin on the end. Also is there anything else that needs to be
done to the mega motherboard for the installation of this unit?
Its actually a TOS CPUcard by artifex GmbH
If so, where does the rest of the board go? Can you tell by your
instructions where to fit the board so the 68000 can see it?
I got something similar in my Mega ST (Wizztronics Compatability
II), and it works like so:
The part that sounds similar to your board, is the one lead wire.
In the case of the compatability 2 board, this wire goes to pin 22 on
the U9 ROM socket (The front most ROM socket on the right side).
There's a couple of ways you can do this.
It's a very good chance that your mystery wire goes to pin 22 of
U9. If you have not bent out any ROM pins and jumpered them together,
etc....then you'll need to REMOVE the old ROMS to try this hook up.
Hope this helps, Brian Roland <BJRoland@bellsouth.net>
Der Autor des nun folgenden DOITYOURSELF Umbau auf TOS 2.06 ist
mit leider unbekannt!
TOS 2.06 im Eigenbau
Wichtig bei diesem Umbau: Es geht nicht ohne die GALs! Die
Listings finden Sie im Order /Programm/Tos206/. Es kann keine
Funktionsgarantie gegeben werden da mir der Autor dieser Geschichte
unbekannt ist und ich diesen somit auch nicht Fragen kann. Die GALs
müssen für diese Erweiterungen mittels einem entsprechenden
GAL-Programmiergerät erstellt werden.
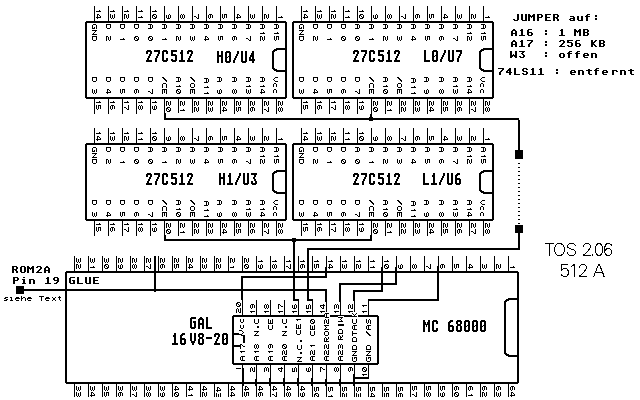
GAL16V8-25: am einfachsten mit Billigsockel auf CPU löten, wie in
den vier Bildern unten zu sehen ist.

Pin    10     GND
Pin  1 9      geht nach A17   CPU Pin 45
Pin  2 8      geht nach A18   CPU Pin 46
Pin  3 7      geht nach A19   CPU Pin 47
Pin  4 6      geht nach A20   CPU Pin 48
Pin  5 5      nicht benutzt
Pin  6 4      geht an   A21   CPU Pin 50
Pin  7 3      geht an   A22   CPU Pin 51
Pin  8 2      geht an   A23   CPU Pin 52
Pin  9 1      geht an   Masse CPU Pin 53
Pin 10        geht an   Masse CPU Pin 53
Pin    20
Pin 11 19     geht an   /AS   CPU Pin 6
Pin 12 18     geht an   DTACK CPU Pin 10
Pin 13 17     geht an   RD/W  CPU Pin 9
Pin 14 16     geht an   ROM2A:  W4 unten bei Mega ST oder GLUE Pin 19
Pin 15 15     geht bei 512K Eproms an /CE (Pin 20) von ROM0 LOW (U7)
              oder an /CE (Pin 20) von ROM0 HIGH (U4)
              oder an W4 oben(Verbindung zu PIN 20 an L0 oder H0)
Pin 16 14     geht bei 512K Eproms an /CE (Pin 20) von ROM1 LOW oder
              ROM1 HIGH oder an ROM 1 (Pin 20 der Glue). Hier ist keine
              Unterbrechung erforderlich
Pin 17 13     ist nur intern benutzt
Pin 18 12     ist frei
Pin 19 11     ist frei
Pin 20        geht an +5V
Bei Verwendung von 4 Stück 512K Eproms:
Bei Mega STs die Jumper W2 nach links, W3 nach rechts und W4 offen
und den 74LS11 bei Pin 12 unterbrechen.
Ein wichtiger Hinweis zum Schluß:
Wer 16 MHz Beschleuniger nutzt sollte nur Eproms nehmen, die
schneller als 150 ns sind!
Verdrahtung für TOS 2.06:
GAL16V8-25: am einfachsten mit Billigsockel auf CPU löten,
wie in den Bildern zu sehen ist
Pin  1       geht nach A17   CPU Pin 45 und bei Mega ROMs Pin 2!
Pin  2       geht nach A18   CPU Pin 46
Pin  3       geht nach A19   CPU Pin 47
Pin  4       geht nach A20   CPU Pin 48
Pin  5       nicht benutzt
Pin  6       geht an   A21   CPU Pin 50
Pin  7       geht an   A22   CPU Pin 51
Pin  8       geht an   A23   CPU Pin 52
Pin  9       geht an   Masse CPU Pin 53
Pin 10       geht an   Masse CPU Pin 53
Pin 11       geht an   /AS   CPU Pin 6
Pin 12       geht an   DTACK CPU Pin 10
Pin 13       geht an   RD/W  CPU Pin 9
Pin 14       geht an   ROM2A:  W4 unten bei Mega ST oder GLUE Pin 19
             oder CE oberhalb der MMU im 1040, der Punkt, der mit Pin 19
             der Glue Verbindung hat.(durchmessen!)
Pin 15       geht bei 512K Eproms an /CE (Pin 20) von ROM0 LOW (U7)
             und an /CE von ROM0 HIGH (U4)
             oder bei Mega STs an W4 oben(Verbindung zu PIN 20 an L0
             oder H0)
             oder bei 1040 an CE oberhalb der MMU an den Punkt, der mit
             Pin 20(CE) von H0 und L0 verbunden ist.
Pin 16       geht bei 512K Eproms an /CE (Pin 20) von ROM1 LOW und
             ROM1 HIGH oder an ROM 1 (Pin 20 der Glue). Hier ist keine
             Unterbrechung erforderlich
Pin 17       ist nur intern benutzt
Pin 18       wird wie PIN 15 verdrahtet bei Verwendung von 1MB Eproms.
             Geht an /CE (Pin 22 der Megaeproms oder PIN 20 des alten
             Sockels) von LOW 0 und HIGH 0
             oder bei Mega STs an W4 oben(siehe PIN 15)
Pin 19       ist frei
Pin 20       geht an +5V
Bei Verwendung von 2 Stück 1MB Eproms:
Zusätzlich bei Mega STs die Jumper W2 nach links und W3 nach
rechts und W4 offen und Pin 12 vom 7411 unterbrechen. Zusätzlich
bei 1040 STs die Lötbrücken A16 auf 1MB, A17 auf 256K und CE
offen.
Bei Verwendung von 4 Stück 512K Eproms:
Wichtig für 260ST und 520ST und alte 1040 ST mit 6 Eproms:
Ältere Rechner: Pin 1 der Eproms verbinden und an A16 an CPU
Pin 44 anschließen. Die Eproms dürfen mit Pin 1 nicht in
der Fassung stecken!
Ein wichtiger Hinweis zum Schluß:
Das Copyright der Schaltungen liegt beim Autor der sie erstellt
hat. Leider ist dieser mir unbekannt.
TOS 2.06 for Atari Computers
From: philipt@dial.pipex.com Philip Taylor 1999
Introduction
There are two main incompatibilities between TOS 2.06 and the
ST(E):
Soon after the release of TOS 2.06, bug reports started appearing
in the German literature. One of the most serious was the 'arrow'
problem viz. when you click on a window arrow or slider bar in order
to move the visible part of the window, TOS redraws the window not
once but twice. This is especially irksome with a DTP program like
Pagestream where window re-draws are frequent and take considerable
time. Patches for this bug also require modification of the ROMs. So
Atari programmers began blowing their own EPROMS with all and sundry
patches applied. A suite of programs called TOSPATCH can be found in
many Atari FTP sites. It lists many corrections and improvements, and
provides the facility to read ROMs, apply whatever patches you want,
and generate image files or Motorola S-format files suitable for
driving an Eprommer.
The German patches which have absolute addresses are not all in
the right position for the UK version of TOS 2.06. Philip Taylor and
Darryl Piper therefore devised patch files specifically for UK ROMs.
These patch files (.FIL) work with the standard TOSPATCH suite of
programs.
Gemulator
The following describes features of TOS new to version 2.06 - note
however that some features were present in Rainbow TOS 1.06. A
thorough familiarity with the fundamentals of TOS as described in the
Atari "Owner's Manual" is assumed.
Boot
Drag and Drop
Copy...Date Stamp
Move
Rename a file
Copy and Rename
Move and Rename
Open Folder into a New Window
Open a Window on Drive ?
Scroll window contents
Help
Undo
Warm boot
Cold boot
Deselect all Items
Print a text directory listing of the top window
Enter any ASCII Code
The Menus
Keyboard Shortcuts
File Menu
Open [O]
Show Information...[S]
Search...[L]ocate
Delete Item...[Delete]
Create Folder [F]
Close Directory [B]ack
Close top window [C]
Bottom to Top [W]
Select All Items [A]
Set File Mask...[M]
Format Floppy Disk...
View Menu
Show as Icons [I]
Size to Fit
Set Colour & Style
Options Menu
Install Icon...
Install Application...
Install Devices
Read .INF File...
Desktop Configuration...
Save Desktop
Print Screen
Organising programs
In addition to the obvious keyboard shortcuts which are listed
when you press the <HELP> key in TOS 2.06 I'm looking for other
useful shortcuts. So far I've written the following for my TOS 2.06
user-guide:
* Depending on how much memory your computer has, the memory test
can take more than a minute to complete. Press any key to bypass the
memory test.
* If you have a hard disk you may want to wait a few seconds
before bypassing the memory test as it'll give the drive the time
needed to get ready.(!nl)
* Hold <CONTROL> while booting to boot without any AUTO
programs, ACCessories or the TOS 2.06 setup file
("NEWDESK.INF").
This will load the hard-disk driver (if you have a hard disk)
making it available from the desktop, but nothing else and is useful
for situations where you've messed up one or several setup files, or
have problems with certain AUTO programs/ACCessories. After booting
this way you can disable/remove them and reboot again the usual way.
After entering the desktop, go to the "Options" menu and
select "Install Devices" which will give you access to all
the hard disk partitions).
I've also noticed that if you press (and keep holding) the
<ALT> key while booting the machine will completely bypass the
hard disk (not even loading the hard disk driver). I'm wondering if
this is a feature of TOS 2.06 or a keyboard-shortcut of the harddisk
driver (I'm using "HDdriver")?
Some of the non-menu specific shortcuts are shown by pressing the
<HELP> key while others are undocumented elsewhere, but
explained here. In the examples below i.e. <ALTERNATE> and D
means "press and keep holding the ALTERNATE key while pressing
D....
* <ALTERNATE> and 1: set display to low resolution (if
available).
* <ALTERNATE> and 2: set display to medium resolution (if
available).
* <ALTERNATE> and 3: set display to high resolution (if
available).
* <ALTERNATE> and drive letter: opens a new window with the
contents of that drive
(i.e. <ALTERNATE> and D opens up a new window with the
contents of drive D).
* <CONTROL> and drive letter: replaces the currently active
window with the contents of that drive (i.e. <CONTROL> and F
replaces the window with the contents of drive F). If there are no
open windows on the desktop this shortcut will open a new window with
the contents of the drive letter you've entered.
* <ALTERNATE> and double-click a folder: will open a new
window with the folder's contents.
* Hold down the <ALTERNATE> and double-click on a folder:
the contents of the folder will open into a new window.
* Hold down (and keep holding) <SHIFT> while single-clicking
files/folder to select several items at once (i.e.
copying/moving/deleting several files and/or folders at once). You can
also use the mouse to scroll up/down the window if necessary, without
loosing the selected files as long as you keep holding the
<SHIFT> key.
* Hold down <CONTROL> while copying files: the files will be
moved (the originals will be deleted.)
* Hold down <ALTERNATE> while copying files: you can rename
the new copies of the files.
* Hold down <ALTERNATE> and <CONTROL> while copying
files: this both moves the files and lets you rename the new files.
* Press <ESC>: refresh (update) the current active window.
Useful if you've got a window open showing the contents of a floppy
disk which you've exchanged with another disk in the meantime.
Pressing <ESC> will show the contents of that new disk.
* Most windows with choices have a default option which is
highlighted in bold as shown here (the "OK" button):
If you press <RETURN> (or <ENTER> in most cases) this
option will be selected. The default option is usually also the
"safe" choice, which is good to know if you're in doubt and
afraid of messing things up).
* Don't have a mouse? Not a permanent solution, but...
* <ALTERNATE> and arrow keys to navigate (keeping the keys
depressed repeats the movements, the speed according the keyboard
repeat rate set in the "general" CPX control panel module).
* <ALTERNATE>, arrow keys and SHIFT to navigate more
accurately.
* <ALTERNATE> and Insert to select a file/icon/program
(single-mouseclick).
* <ALTERNATE> and Insert (twice) to open a file/icon/program
(double-mouseclick).
* <ALTERNATE> and (keep holding) Insert while using arrow
keys to drag file/folder/program.
* <ALTERNATE> and (stop holding) Insert while using arrow
keys to drop file/folder/program.
* <ALTERNATE> and numeric keypad: get access to ANY
character available in the Atari character set, regardless of which
language keyboard your computer has (i.e. hold <ALTERNATE> while
typing 142 on the numeric keypad, then release the <ALTERNATE>
key which presents you with the letter Ä). Look up the Atari
ASCII character set table for the decimal equivelants of each
character.
Shortcuts from Hallvard
In TOS 2.06 user guide is that TOS 2.06 can come in a variety of
EPROM types, so there's no definitive single setting of the jumpers,
but rather "look up the table (which I'm supplying in the guide)
to see where the jumpers for your TOS 2.06 chips go?
Definitely. *I* have only seen 2.06 in 27C010 (or pin-compatible)
EPROMs, but Atari definitely used the ROMs with a different pin-outs
in STE machines.
Come to think of it (it's strange that I missed something so
obvious), but there were TOS chips before version 2.06, and the STe
was equipped with 1.62 (I believe some of them were also equipped with
the bugged 1.06, or 1.6 as many like to call it), and these were 28
pin ROMs.
The jumper settings for the different types of EPROM/ROM chips
used in the STe: I got the numbers and the jumper settings from the
STe schematics.
OK, moving on to the actual list.There are 3 ROM jumpers on the
STe motherboard, found close to the ROM sockets of course (some ROMs
weren't socketed as far as I know, and the existing ROMs had to be
desoldered first). The jumpers are marked "W-102",
"W-103" and "W-104" and have 3 pins each. Here are
the different jumper settings:
----------------------------------------------
W-102: 1-2
W-103: 2-3
W-104: 1-2

27010     128Kx8 (1 Mbyte) EPROM 32 pins
27C1001   128Kx8 (1 Mbyte) EPROM 32 pins
571000    128Kx8 (1 Mbyte)   ROM 32 pins *
         * swapped pins "A16" (pin 24) and "_OE" (pin 2)
           compared to the preceeding two EPROMs
--------------------------------------------------
W-102: 2-3
W-103: 2-3
W-104: 2-3

571001    128Kx8 (1 Mbyte)    ROM 32 pins
27C1000   128Kx8 (1 Mbyte)  EPROM 32 pins
531000    128Kx1 (128 Kbytes) ROM 28 pins  (NOTE: 28 pins!)
-------------------------------------------------
W-102: any setting
W-103: 1-2
W-104: none (remove jumper)

27256      32Kx8 (256 Kbytes) EPROM 28 pins
-------------------------------------------------
W-102: 2-3
W-103: 2-3
W-104: none (remove jumper)

27512      64Kx8 (512 Kbytes) EPROM 28 pins
-------------------------------------------------
and for those curious.....
here are the settings for the TOS 1.62 (1.06?) chips that came with the
STe in the first place:

W-102: 2-3
W-103: 2-3
W-104: 2-3
and as far as I remember these were 28 pin ROMs.
Copyright © Robert Schaffner (doit@doitarchive.de) Letzte Aktualisierung am 23. Mai 2004 |
|
|