|
|
18.18 Overscan
Overscan display expansion
Stefan Hartmann
Electronic Research and Development Keplerstrasse 11 B 1000 Berlin 10 West-Germany Tel: West-Germany/30 344 23 66, email on Compuserve ID: 72017,3216
"Hey You man, wanna have some Overscan ?"
Introduction of an "Xtended Graphics Mode" for the Atari ST Computers(!nl) from Stefan Hartmann (Hardware and article)
Stop it man ! This article will tell You why ! With a simple switch (cost about a buck) and additionally only at
the STM520: 2 Rectifier diodes, 2 Resistances, a NPN Transistor and a
capacitor, we will show You how to get a visible 59640 Bytes big
Screen Memory (in 50 Hertz Mode). (the following description will
apply for 50 Hertz mode , 60 Hertz Mode and Monochrome-Overscan-Mode
has some other sreen memory size)
What does this mean ? This means in Low resolution mode there are now 420*284 Pixels
available to display, still 16 colors per pixel. In midres resolution
there we have now the gorgious resolution of 840*284 Pixel, still 4
colors per dot. In monochrome mode we get now 688*480 pixel with a
well adjusted SM124 monochrome monitor !
Well this means, in color mode there is no more screen window
visible but pixels all over the screen, indeed some pixels You'll
never see, because they hide behind the left and right monitor tube
border till You adapt Your horizontal screen width !
The same thing is available on the Amiga. There they call this
mode :
OVERSCAN.
This overscan mode is now with this article also possible for all
the Atari ST computers, from the 512KB 260 machine to the Mega ST 4 !
That means the Atari ST can now like the Amiga be used for
semi-professionel Desktop-Video applications for examle together with
a genlock-interface to get a scrolled text message in the lower border
of a video movie.
How was this little hardware modification found ? The story of the Overscan modification began, when some month ago
I got a demo disk on which a nice grahic screen appeared. But what the
hack was this ? In the lower border of the ST screen was a scrolling
text message ! How to come ? Had my monitor been shifted away ?
Not at all ! I couldn`t trust my eyes ! This programmer called Alyssa (special
nickname of this hacker-guy) had programmed a very fine flowing
scrolling text message out of pixel graphics at the bottom of the
screen where normally only the color palette register 0 (that means
the static border color) is available !
Did this guy found an undocumented "poke" to switch off
the lower border and display further pixel graphics,which Mr. Shiraz
Shivji (the father of the ST) didn't told us ?
To understand all this screen manipulation I have shortly to
explain how the ST generates its picture in color mode: In 50 Hertz
Mode the screen is build up of 313 scan lines which are 50 times per
second written onto the tube. (In 60 Hertz mode there are 263 scan
lines displayed)
This means that the Atari doesn't work with Interlace, the so
called "half frames" (semi frames) are placed precisely one
upon onother so there is no placement shifting like in TV-Systems
(e.g. NTSC).
Normally in 50 Hertz mode the first 39 scan lines are displayed
without pixel graphics but with background color palette 0. This is
the upper Border. Then there are 200 scan lines in which the normal
Screen window is displayed but still with this left and right border,
which is still generated from palette 0.
The following 45 scan lines display the lower border, still
palette 0. (normally no pixel graphics available) The last 29 scan
lines of the total 313 lines are not visible, because they are used
for vertikal blanking. This is needed to synchronize the picture
frequency of a connected monitor.
The Blanking is done by the blank-signal that is also generated by
the Glue chip and this signal switches the RGB-D/A-Resistor-Converter
to Zero when the vertikal blank period is active. (In 60 Hertz Mode
the normal mode is : upper border 14 scan lines, 200 display lines, 24
lower border scan lines and 25 scan lines blanked)
A few months ago there arrived the 2 new demo programs
"Amiga-Demo" from the TEX-Programmers ( some special
assembler graphics wizzards ) and the LT.PRG (the death of the left
border) of the TNT-Crew. This 2 programs blowed my mind because they
already featured pixel graphics inside the right (Amiga-Demo) and in
either border(left and right, LT.PRG). How this is possible I don't
know yet, because the assembler code is very sophisticated crypted so
no chance for a tracking monitor program disassembler. But it's
possible that they use a 50 Hertz to 71 Hertz switching every scanline
synchronized with the video adress counter. Must be very tricky code !
They wanna keep this still a secret ! (In the meantime February `89
the gorgious UNION-Demo was launched: Level 16 has now implemented a
full software controlled Overscan screen with no borders at all!;
unbelieveable, but very timeconsumming interruptprogramming; not much
time left for animation !)
I thought, wow !
No problem ! I fetched my scope, booted the Amiga-Demo and switched between the
additional right border pixel display and normal mode. At this time I
took a closer look with the scope next to the Shifter area of the ST
board. That's it! I recognized that if I switched the modes, the
Display-Emable-Signal changed its puls-stop relationship.
The Display Enable Signal determines if pixel graphics should be
displayed by the Shifter or if the border should be displayed (palette
register 0). Every time if this signal goes high, pixel graphics is
displayed, if it is low, palette 0 is displayed.
The Display Enable signal is generated by the Glue, like the
Blank-, HSync- and VSync-Signal which are all used to generate the
picture. The DE-Signal also goes to the MMU and the Timer B Input of
the MFP chip (for counting the scan line through interrupt routines).
The screen is build up with the following sequence :
That means the DCYC signal clocks the Load Input of the Shifter. At this moment the internal counter of the MMU is counting upwards. The actual adress is been written all 2 microseconds to the video
adress counter in FF8205/07/09. Remains at this point the Display
Enable Signal longer at high level, accordingly more memory RAM is
adressed as screen video ram by the MMU and still transfered to the
Shifter during every scan line!
So with the Puls Stop relationship of the DE signal we can
determine the size of the screen window. At last we have the Blank
signal which is also blanking the video signal from the RGB-Converter
during horizontal flyback time and vertikal snchronisation time (as
mentioned above). To complete the description, there is still the CMPS
Signal (Color Map Chip Select), which is generated by the MMU and
which is only changing for telling the Shifter to load a new color
palette. (what will Spectrum 512 look in Overscan mode: super gorgious
!)
Conclusion:
How do I find the right signal in exchange for the DE signal ?
Looking around inside the ST I found the Composite Sync Signal
which is generated by an AND-Combining of the HSync and VSync Signals.
One can use the already installed Composite Sync Signal which feeds
the monitor bush connector. Make sure to use the Composite Sync Signal
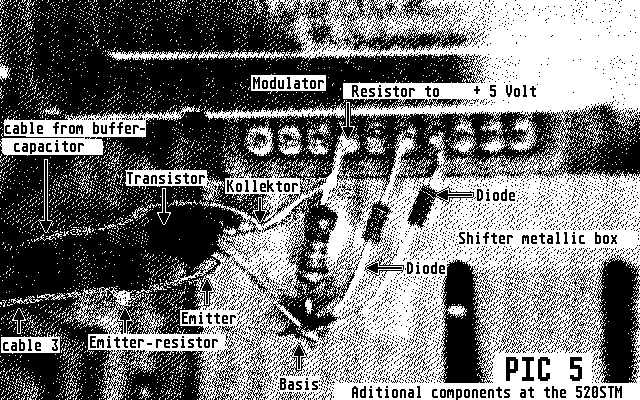
directly from the Emitter of the driver (buffer) transistor. (Take a
look into Your circuit diagram of Your ST!) At the 520 STM (the STs
with RF-modulators) there the internal Composite Sync Signal is
missing. Here You have to add the above mentioned circuit of 2
rectifiers, 2 resistors a transistor and a optional buffer capacitor(
buffers the collector(5Volts) of the transistor versus ground).
This Composite Sync Signal is ideal for controlling the new
Overscan mode. We have been trying other signal for example: only the
HSync, the VSync, the Blank signal or only permanent 5 Volts but this
doesn't work with either 50 and 60 Hertz and GEM couldn't be
installed.
To find a better signal than the Composite Sync signal is not
possible with such a simple modification. The ST has only 4 signal
which come from the GLUE which could be used to create a " new
" Display Enable signal, because all other signals vary !
GEM needs a video scan line whose number has to be able to divide
by 4 to install it. So the Composite Sync Signal was the simplest
solution to find.
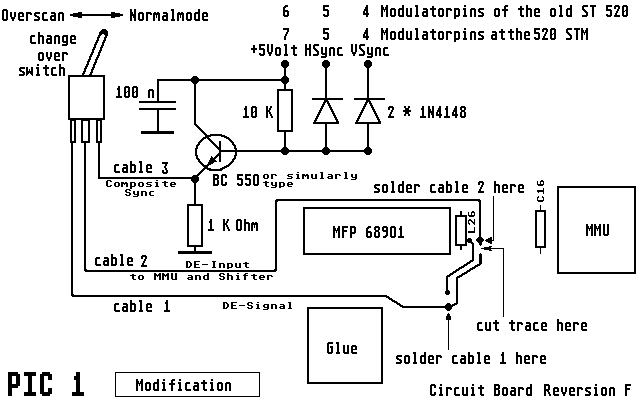
Description of the Hardware Modification
The Display Enable Signal which is going to the Shifter Pin 37 and
to the MMU Pin 52 has to be cut and instead of this the Composite Sync
Signal has to be fed to this two Pins.
This could be done by a simple 3 Pins switch which switches
between the original and the new Overscan Mode. The switch could be
installed at the back of the ST for example. It is also possible to
switch it during operation of the ST without hanging up. If You switch
back it might could happen, that the color palettes have been cycled.
This is due to percussion during switching but could be removed by
switching 3 or 4 times again till the color palettes are in the right
order again. Hint: If there will a shifted palette as the desktop
appears, You have to switch again a few times the change-over switch
so due to percussion this shifted palettes will disappear! This
shifted palettes only sometimes occur during booting but this is the
only time !
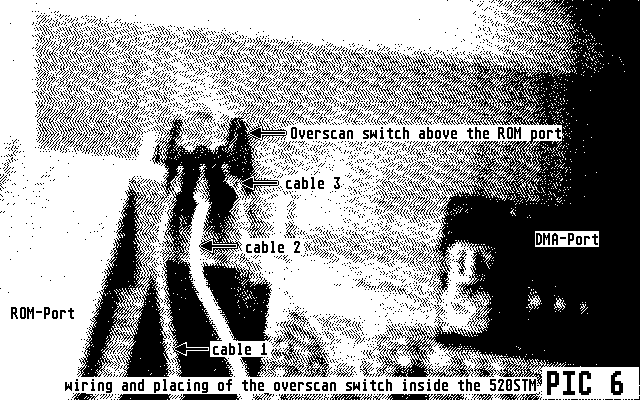
How to connect and wire the Overscan-change-over-switch:
Directly at the Emitter of the Composite Sync signal driver
Transistor You pick up the buffered Composite Sync Signal and feed it
to the third pin of the switch. The second pin of the switch (the pin
in the middle) goes to the pin 37 of the Shifter and pin 52 of the
MMU. The first pin of the switch is connected to pin 39 of the Glue
(Display Enable Signal) Reminder: the MFP 68901 pin 20 still gets the
Display Enable Signal in both modes !!! We have tried to use also the
Composite Sync for the Timer B-Input in Overscan mode, but then the ST
doesn't boot himself after a Reset !
Softwareadaption to the Overscan Mode
If You switch directly from the normal desktop after booting
without any accessories or programs to the Overscan mode, You will see
some nice "pixel trash" in the upper half of the screen, but
going from the very left to the very right.(without a border)
But what has happened to the lower half screen ? There is some
pretty moiree jumping and changing in a strange pattern of 16 bits in
various colors !
What is this, You will ask ?
Don't worry, be happy !
This is only the display of RAM databus signals !!!
This happens because the normal Video screen display Ram is
installed at the top of the available ST Memory. If switched to
Overscan the ST needs more than the 32kBytes but there at the top is
no more available, so behind the end of the RAM the ST displays the
undefinable Databus signals ! What a funny picture ! ( I just wonder
wether the first game will use this for displaying "screen
communication problems" like in the game: Carrier Command ?) So
the answer to get a correct full screen Overscan picture is : Write a
lower Adress into the Screen Starting Adress Pointer FF8201/03 ! But
then there is still the Pixel-Trash, but now all over the screen !
This is because the color bit planes have changed their place.
This can be corrected by adapting the GEM.
This was done by us by writing the Overscan.PRG which adapts the
GEM.
It runs with the Blitter-TOS and the new ROM-TOS 1.4 and the
BETA-RAMTOS and the Developer-RAMTOS 1.4, but not with the old ROMTOS
from 1985 !
You start it out of the AUTO-folder of a disk or from the harddisk
and a whole new OVERSCAN-world opens up.
If You push the CONTROL button during booting, it will come up
with an installation menu and You can change the Overscan-resolution,
so it will fit to Your monitor screen adjustment ! You can then save
this Overscan-adjustment, so it will boot itself up with the right
size the next time !(The installation menu is only available from
Overscan.PRG version 1.5 up)
The GEM desktop with this resolution is just wonderfull !
With this solution one can use already a few programs, which get
their screen parameters directly from GEM and don't write the graphics
directly into the screen memory, for example the DOODLE.PRG, Wordplus,
GEM Paint, Easydraw, Kuma Graph and Spreadsheet etc. These programs
and some more already work with Overscan in color and monochrome mode
!
Unfortuneally the best two graphics programms, CAD3D from TOM
HUDSON and CYBERPAINT from JIM KENT don`t work at this moment with
this higher resolution.
TOM and JIM are YOU jet listening to this ???
This Overscan.PRG patches the TOS with the negative LINE
A-Variables, so every application, for example CAD3D only would have
to fetch the actual SCREEN SIZE with the command OPEN WORKSTATION
(VDIte this will also apply for the the new 19" Matrix or Mat
Screen Monitors that are used espacially for DTP with Calamus and
other applications.
Wouldn`t this be great to design Your objects on such a big screen
with CAD3D?
Imagine an OVERSCAN-Delta-Animation in color played back in
realtime from a 800 MBYTE Hardisk, synchronized by midi-clock with a
midi-sequenzer (a second Atari ST for example ) which is controlling a
complete orchestra of synthesizers ! What a realtime multi media show
this would be ! This could also open up a whole new world of
videomusic production in the Music-Business Industry !
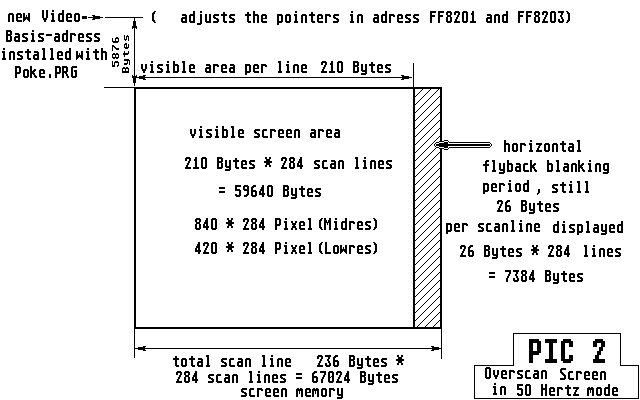
Still a few words to the screen-memory partitioning in OVERSCAN
mode in 50 Hertz image frequency:
The visible screen memory is now 59640 Bytes (if Your monitor can
be regulated to this screen width and height). But because of the
Composite Sync Signal there are also pixels displayed during the
blanking time ( flybacktime) of one scan line. This are 26 Bytes per
scan line. This adds up to 7384 Bytes more than the visible 59640
Bytes. This means the actual size of the screen memory has to be 67024
Bytes big. (calculated for 50 Hertz, in 60 Hertz some other size will
fit)
This about 7 kByte can be used for storing palette information or other stuff. If it's to memory wasting the software could also store only the 59640 Bytes for one screen but then reloading will take a short moment longer, due to jump over the 26 unused Bytes in every video scan line. Because of the puls stop relation time of the Composite Sync signal during vertikal blanking time there are also some Pixels transferred which aren't visible but blanked. That's why there has to be an offset starting adress of about 5 kBytes subtracted from the video.bas pointer registers FF8201/03. But this is already done too with our Overscan.PRG ! If we would
have tried to avoid these little two disadvantages we would have been
forced to generate a very special NEW DISPLAY ENABLE Signal which
would have been needed an anormous amount of counters and flip-flops.
So it's easier to live with this a little more memory consuming but
simple to install Composite Sync signal.
The difference between 50 and 60 Hertz color mode :
In 50 Hz mode with using the Composite Sync signal You have 236
Bytes per scan line. 210 Bytes are visible . The other 20 Bytes aren't
visible because of horizontal flyback blanking ( the BLANK signal of
the GLUE is doing his job during this time period !) Well, 236 Bytes
can be divided by 4 , this is what GEM needs. So 50 Hertz GEM SHELL
installation is no problem.
In this moment our Overscan.PRG (version 1.6) runs the GEM SHELL
only in 50 and 71 Hz.
In 60 Hertz mode You have 234 Bytes per scan line. This is only
dividable by 2! So it might be that we will get GEM only to work in
Mid-Res-mode in 60 Hz, but a special written Cyberpaint could also
handle 60 Hertz, if the color palettes are adapted the right way in
Lowres. There would have to be 2 different versions of Cyberpaint like
Spectrum 512, because in 50 Hz there are 512 clock cycles and in 60 Hz
there are 508 Clock cycles per scan line. In 60 Hz there are also only
238 visible scan lines instead of 284 of the 50 Hz mode.
My proposal is, first to adapt CAD3D to 50 Hz mode so that the
created DELTA-files could then transfered to a special Cyberpaint that
might handle also 50 and 60 Hz mode.
This Overscan-Cyberpaint then could also convert the 284 scan
lines pictures to the visible 238 NTSC compatible scan lines pictures
!
So You could design Your CAD3D animation with a 50 Hertz bigger
screen and load it with Cyberpaint into a 60 Hertz compatible
animation ! How about this ???
The monochrome Overscan-mode
When we developed the hardware Overscan mode for the first time in
end of september 1988, we only adapted the color mode. When we
switched to the monochrome mode , there the flyback beams of the
monochrome monitor SM124 were visible because in monochrome mode the
ST sends NO Blank-signal to the SM124 circuit. Look at it now in
monochrome Overscan-mode, before You boot the Overscan.PRG ! Now You
still also see the flyback beams because there is no flyback blanking
due to this new puls- stop- time- relationship of the composite sync
signal !
So the SM124 has to blank the flyback beams itself. With the
normal DE-signal controling the picture size it's no problem. But we
did modify this with Overscan, so switched to the Composite Sync
signal for controling the picture size, we get now 800*500 pixels
generated by the ST in monochrome mode. But this is to much for the
SM124: It doesn't fit onto the screen of the SM124. This means: many
pixels are displayed during flyback time of the electron beam and we
get the unwanted visible flyback beams onto the screen. So we thought,
that the monochrome mode wouldn't be possible to install with the
Composite Sync signal.
But then in January 1989 I had the idea to fill all the new screen
memory with $FF: And THAT`S IT : the whole screen was BLACK ! No more
flyback beams to see ! So it was possible to suppress the flyback
beams by adjusting the screen memory in this way, that in every
visible monochrome Overscan- scanline the last Bytes have to be set to
$FF !(so they are blanked and no more visible) Well, this is the trick
to install the GEM SHELL also in monochrome Overscan mode. With this
software adjustment we get now at maximum 688*480 pixel without
distortion on a, from the manufacturer well calibrated, SM124 monitor.
The resolution is again adjustable with our Overscan.PRG through the
installation menu.
With a NEC Multisync monitor one gets already now 732 pixel in one
scan line, so it's now yet possible to do true HERCULES graphics
emulation, which needs only 720*350 pixel. With the NEC Multisync we
have now 732*480 pixel! Isn't that gorgious ?
Maybee Avantgarde Software will fit their PC-Ditto to run this
fully emulated Hercules graphics mode ??? How about that ?
There is the rumour that Mr.Sack from West Germany, who has
developed the first really running Hardware MS-DOS emulator will
include OVERSCAN for emulating the HERCULES graphics mode in the near
future !
I'm just working now to modify the SM124 monitor with a little
additionally hardware, so it will also display at least the 720 pixels
in one scan line for Hercules emulation.
Maybee I'll also get the full 800*500 pixel display to work on the
modified SM124 soon ?!
(Take a look into the OVERSCAN.DOC-file fore more explanation of
the new screen memory partitioning in monochrome Overscan mode !)
Final conclusion
Overscan brings a whole new world of applications to the ST
especially in Desktop-Video and new Bigscreen-applications and
Hercules emulation in monochrome mode. In color mode there will be
programms like on the Amiga in two versions, one PAL and one NTSC
versions, unfortuneally.
So there is still the hope that HDTV brings us a new world
standard in picture frequency and picture resolution, so everybody
could swap and exchange videotape cassettes with computer-graphics or
movies on it between Europe and America without needing to convert !
I still hope, that Europe will change to 60 Hertz picture
frequency, because if not, we will have to program our next generation
of color computers, for recording HDTV graphics onto tape, again in
the flickering 50 Hertz mode. But because a new standard for
television surely remains at least for 20 years, please beware us of
the flickering 50 Hertz EUREKA-HDTV-Freaks-standard !
It would be no problem to use already today 60 Hertz picture
frequency in Europe, as You can see it, if You connect Your ST to the
SCART(RGB-Inputs) connector of Your television set and then switch
Your ST to 60 Hertz by software !(change Hz.PRG) No problem at all !
This article is copyright protected (c) 1989 and 1990
P.S.: I have drawn some pictures with Degas monochrom of the new
screen partitioning and we have made some digitized photos, also PI3
format, which shows the board modification and the switch wiring.
This is how to install the Overscan
Copy the OVERSCAN.PRG to Your auto-folder on Your harddisk or if
You don't have a harddisk copy it to Your boot disk into an auto
folder.
Copy also the VIDEO50.PRG to the auto-folder to make sure Your ST
will start with 50 Hertz picture frequency in color mode.
If You still have the old ROMTOS from 1985 inside Your ST, then
copy also a BETA-RAMTOS 1.4 or the Developer-RAMTOS 1.4 to Your boot
disk into the root-directory ! This disk has to have then a bootable
sector, so that it will boot automaticaly the TOS.IMG-file (BETA- or
Developer-RAMTOS 1.4).
(If You already have the Blitter-TOS or the new (EP)ROMTOS 1.4
inside Your ST, then You only have to have the OVERSCAN.PRG and
VIDEO50.PRG inside the autofolder and don't need an additional RAMTOS)
Switch the Overscan-switch to OVERSCAN and boot the disk or boot
from Your harddisk.
If You press the CONTROL-, SHIFT-, or ALTERNATE- key, the
Overscan.PRG will come up with an installation menu. From this menu
You can fit the screen resolution to Your monitor size and still can
save this, so Your ST will start up with the right size the next time.
With key "P" You get the "Physebase"-emulator, so
Calamus DTP works now also !
In color mode: If You want to change from lowres to midres go to
the "change resolution"-menu from the GEM SHELL and click
"okay" while depressing the CONTROL-,SHIFT-, or
ALTERNATE-key.Then the OVERSCAN-installation menu comes up again and
You can change to midres and the other way around. Use the arrow keys
and the + - * / keys to modify the size of the Overscan screen. The
HELP key brings You back to the menu. "S" saves the new
screen size and "Q" quits the menu without saving to
(hard)disk.
Have fun with the Overscan, Stefan Hartmann.
I have been trying to instal OverScan to a STFM with TOS 1.4
Strangely enough sorting out which track of the PCB to cut to
isolate the MMU and Video-Shifter proved to be easy, but I am having
difficulty in picking up the new Display-Enable signal from the
location the document instructs me to, and I quote:
Well of course I haven't a circuit diagram, but I hope somebody
reading this will have. I've tried to trace where it should be
connected, but the PCB at this point is very congested and I can't
even decide which transistor is the one referred to.
I have tried using the Composite-Video output, pin 2, of the
monitor socket unsuccessfully, but this failure is implied in the
instruction.
The motherboard is marked C070789-001 REV.F2 and GX-211 VO 3890
Would anyone have a circuit diagram from which they can tell me in
detailed layman's terms the right transistor to which to make this
connection?
Mit einer originellen Idee und einer einfachen Schaltung, garniert
mit einem Stück Software, läßt sich die
Bildschirmauflösung des ST massiv erhöhen. Das Produkt nennt
sich Autoswitch-Overscan und ist für DM 97,- erhältlich.
Overscan hat eine längere Entwicklungsgeschichte und tauchte
erstmalig unter dem Namen Hyperscreen in einer ST-Zeitschrift auf.
Damals waren als Hardware nur ein paar Kabel und ein Umschalter
notwendig. Die Software war frei und wurde mehrfach überarbeitet.
Die Entwickler haben sich nun hingesetzt, und aus der Idee ein
professionelles Produkt gemacht. Herausgekommen ist der
Autoswitch-Overscan, der die Auflösung des ST massiv erhöht
und sich durch eine kleine Logik automatisch auf nicht
auflösungsunabhängig programmierte Software einstellt.
Die mit Overscan erzielbaren Auflösungen sind phänomenal
und sollen selbst die Atari-Entwickler überrascht haben. Ein
normaler ST mit der Overscan-Schaltung kann monochrom bis über
700 * 480, in der mittleren Auflösung bis über 800 * 280 und
in der niedrigen Einstellung bis zu 400 * 232 Pixel darstellen.
Wie hoch die Auflösung getrieben werden kann, hängt vom
verwendeten Monitor- Modell und teilweise auch von geräteeigenen
Eigenschaften ab. Die Entwickler geben beispielsweise für einen
SM124 von Atari eine monochrome Auflösung von 672 * 480 an, ein
NEC Multisynch GS bringt sogar 752 * 480. Mit Atari's SC1224 kommt man
auf 384 * 280 bzw. 752 * 280 - ein Multisynch oder ein AMIGA-Monitor
erreicht dagegen 400 * 280 bzw. 816 * 280 in Farbe. Ein Test mit einem
billigen portablen Fernseher erbrachte noch 352 * 272 bzw. 736 * 272
Pixel.
Möglich wird das Ganze, indem - grob gesagt - der Shifter
einen höheren Takt erhält. Dieser wird einfach an einer
anderen Stelle auf der ST-Platine abgegriffen und von der Hardware mit
dem Shifter verbunden. Aufgrund der eingebauten Logik in zwei
GAL-Bausteinen kann die Verbindung und damit die Auflösung unter
Software-Kontrolle geschaltet werden. Der Software-Treiber
kümmert sich im Kern um die Verwaltung des neuen
Bildschirmspeichers, erlaubt die Umschaltung der Auflösung und
bindet das Ganze in GEM ein.
Overscan kann mit allen ST Modellen mit Ausnahme des 1040STE
verwendet werden. Bei diesem Modell fiel ein benötigtes Signal
der Integration zum Opfer und ist nicht mehr zugänglich, sondern
direkt auf einem Chip verschaltet.
Am Anfang steht der Einbau des kleinen Platinchens, auf dem sich
die beiden GAL- Bausteine befinden.
Es erhebt sich ein kleiner Kabelbaum aus der Schaltung, denn
immerhin müssen zehn Verbindungen an verschiedene Stellen auf der
ST-Platine gezogen werden.
Neben dem Auffinden dieser Punkte und der Lötarbeit sind noch
drei Leiterbahnen auf der ST-Platine zu durchtrennen. Aufgrund eines
Layout-Fehlers muß bei einigen MEGA-Modellen ein weiterer
Kontakt durchtrennt werden. Sind die Verbindungen gezogen, kann das
Overscan-Platinchen im Rechner verstaut werden, was durch einen
einfachen Haftsteifen unterstützt wird. Im Bild hat Overscan
neben dem 68000 Platz gefunden und gerät auch nicht mit einem
pc-speed ins Gehege. Sollten andere Zusatzplatinen vorhanden sein, ist
die Plazierung der Overscan-Schaltung ebenfalls problemlos.
Der Einbau ist nicht unbedingt für Anfänger geeignet, da
die entsprechenden Lötpunkte auf der Platine natürlich exakt
verbunden werden müssen und die Leiterbahnen auf einer modernen
Platine wie der des ST sehr fein sind. Traut man sich den Einbau nicht
zu, sollte man ihn besser einem Händler oder einem versierten
Bekannten überlassen.
Das 48-seitige Handbuch beschreibt den Einbau detailliert in 18
Schritten und gibt einige Tips, falls nicht sofort das gewünschte
Ergebnis eintritt. Mehrere Grafiken beschreiben die Lage der
durchzutrennenden Leiterbahnen und der Lötpunkte für die
verschiedensten ST-Modelle und -Platinen. Das Handbuch sollte keine
Fragen zum Einbau offen lassen.
Der Software-Treiber OVERSCAN.PRG muß von der mitgelieferten
Diskette in den AUTO-Ordner kopiert werden. Damit wird bei jedem
Booten automatisch die Overscan-Darstellung eingeschaltet. Beim ersten
Start muß die Software auf den verwendeten Monitor konfiguriert
werden, wozu auf Festhalten einer Shift-Taste beim Booten ein
Menü erscheint.
Ein Rechteck zeigt dann den momentan von Overscan genutzten
Bildschirmbereich an. Er kann mit den Pfeiltasten so
vergrößert oder verkleinert werden, daß er
vollständig auf dem Monitor angezeigt wird. Mit dem Zehnerblock
läßt sich auch die Lage des angezeigten Monitor-Bilds
verändern, so daß eine Anpassung an die Fähigkeiten
des Monitors einfach und interaktiv möglich ist.
Weiterhin existieren verschiedene Optionen bei der Konfiguration.
So kann bei einem Farbmonitor die Auflösung, die
Darstellungsfrequenz und die Farbe des Bildschirmrands gewechselt
werden.
Da die ST-interne Hardcopy-Routine ihre Macken hat und mit einem
großen Bildschirmspeicher nicht umgehen kann, läßt
sich Overscan so einstellen, daß beim Auslösen einer
Hardcopy der gesamte Overscan-Bildschirminhalt in eine Datei im
GEM-Image-Format geschrieben wird. Im Schwarz-Weiß-Betrieb
läßt sich die Auflösungsumschaltung durch eine
Zusatzspeicher-Option beschleunigen.
Hat man alle Einstellungen nach Wunsch getätigt, werden sie
in OVERSCAN.PRG abgespeichert und stehen beim nächsten Booten
sofort bereit. Will man - aus welchen Gründen auch immer - nur
kurzzeitig eine andere Bildschirmauflösung benutzen, kann das
Konfigurations-Menü auch ohne Abspeichern verlassen werden.
Beim nächsten Booten fährt der Treiber dann die
Bildschirmauflösung mit einem optischen Effekt auf die
konfigurierten Werte hoch. Es erscheint der Desktop und der seinen
festen Bildschirmrahmen gewohnte Benutzer wird zunächst einmal
den Atem anhalten.
Neben dem offensichtlichen Auflösungsgewinn (in den
Farbauflösungen läßt sich die Pixel-Anzahl glattweg
verdoppeln) sieht man auch, daß hier mit einem normalen ST auch
die Mehrspalten-Darstellung der Directory- Fenster möglich ist.
Ohne Übertreibung - man fühlt sich fast wie auf einem
Großbildschirm.
Leider hat sich schon mit dem Aufkommen von Großbildschirmen
oder dem Software-Emulator BigScreen gezeigt, daß viele
ST-Programme nicht auflösungsunabhängig programmiert sind.
Dies reicht von einfacheren Problemen wie festen
Maximalgrößen für Fenster bis zu Programmen, die
direkt in den - vermeintlich normalen - Bildschirmspeicher schreiben.
Letztere liefern bei veränderter Bildschirmgröße wilde
Bitmuster und sind in einer solchen Konfiguration nicht zu gebrauchen.
Ursache dafür ist sicher das Fehlen fester Atari- Richtlinien
für die Programmierung, wie sie beispielsweise Apple für
seinen Macintosh durchgesetzt hat.
Dieses Problem wird sich nicht nur bei Systemen mit
Großbildschirmen bemerkbar machen, sondern auch auf den neuen
Atari-Maschinen TT und EST, die bekanntlich erheblich mehr
Auflösungsmodi bieten. Aber auch auf einem mit Overscan
ausgerüsteten normalen ST machen einige Programme
Schwierigkeiten. Das Problem wird gelöst, indem man Overscan
einfach mitteilt, welche Programme nicht in der erweiterten
Auflösung laufen. Ruft man solche Software vom Desktop, aus einer
Shell oder anderen Programmen auf, schaltet Overscan automatisch ohne
daß irgendwelche Eingaben nötig wären auf die alte
Originalauflösung. Wird ein auflösungsabhängiges
Programm beendet, tritt wieder der erweiterte Overscan- Modus in
Kraft.
Festgelegt wird der gewünschte Auflösungmodus in einer
ASCII-Datei OVERSCAN.INF, die beim Booten eingelesen wird. Dort
könnte man beispielsweise mit einem Eintrag "GULAM.PRG
-" auswählen, daß die Shell Guläm nicht in hoher
Auflösung gefahren wird. Übrigens bleibt hier die
eingestellte Auflösung beim Aufruf weiterer Programme aus der
Shell erhalten - es sei denn, man hätte beispielsweise mit einem
Eintrag "WORDPLUS.PRG +" festgelegt, daß WordPlus
immer in der höheren Auflösung gestartet wird.
Bei der Erstellung der Einträge kann man übrigens auch
Listen mit Programmnamen schreiben, für die eine Einstellung
gemeinsam gelten soll oder Wildcards verwenden. Die .INF-Datei wird
beim Einlesen gepackt, wofür ein Datenraum von maximal vier KB
bereitsteht. Gerade durch die Wildcard dürfte dies ausreichen.
Man wird also während der Arbeit mit seinen Programmen
feststellen, ob ein Programm auflösungsunabhängig ist.
Trifft dies nicht zu, trägt man einfach den Namen mit einem
Editor in die Info-Datei ein und nach dem nächsten Booten stellt
Overscan automatisch den gewünschten Modus ein. Will man sofort
mit einem problematischen Programm arbeiten, kann man durch
Drücken von Alternate+Control beim Doppelklick auf dem Desktop
manuell die original ST- Auflösung anwählen. Diese
Tastenkombination läßt sich übrigens durch einen im
Handbuch beschrieben Patch mit einem Disk-Monitor ändern.
Der Software-Treiber muß bei der Umschaltung der
Auflösung eine ganze Reihe von Betriebssystem-Variablen
verändern. Gleichzeitig hängt er sich in fast alle System-
Trap-Vektoren ein, um das Verhalten einiger Funktionen zu ändern.
Der Treiber arbeitet mit allen TOS-Versionen, darunter auch das
"durchgepatchte" KAOS. Lediglich bei der Uraltversion des
ersten ROM-TOS sind Patches nötig.
Für den Programmierer implementiert der Software-Treiber
zusätzliche XBIOS- Funktionen, mit denen beispielsweise die
Versionsnummer abgefragt oder die Auflösung von einem Programm
aus umgeschaltet werden kann. In einem Header- File für TURBO-C
werden die Funktionen zugänglich gemacht.
Da Overscan auch implizit eine Testmöglichkeit für die
Auflösungsunabhängigkeit eigener Programm ist, sollte unter
Overscan selbsterstellte Software zu den verschiedensten
Auflösungen kompatibel sein. Auf welche Feinheiten man in der
Programmierung man dabei zu achten hat, und mit welchen GEM-Funktionen
man beispielsweise die X-Auflösung wirklich sicher abfragt,
erläutert ein kurzer, aber sehr interessanter Text auf der
Diskette. Zwei Beispielprogramme in GFA und C sowie C-Routinen zur
auflösungsgerechten Verwendung von Image-Daten bei Icons runden
die zusätzliche Software ab.
Übrigens läßt sich die erhöhte Auflösung
beispielsweise mit pc-speed schon seit geraumer Zeit nutzen. Durch
Auswahl der Bildschirminstallation "HYPER-HERC" kann mit
Overscan eine Hercules-Karte emuliert werden. Nach Angaben der
Entwickler sollen auch der Mac-Emulator Spectre und der QL-Emulator an
Overscan angepaßt werden.
Bezugsadresse:
Copyright © Robert Schaffner (doit@doitarchive.de) Letzte Aktualisierung am 23. Mai 2004 |
|
|