| |

Ram Gizmo Atari Falcon

I found some words to the Ram Gizmo in comp.sys.atari.st
I had a Ram Gizmo that I bought from Chro-Magic, and I installed 4
4-meg SIMMs, rated at 80ns for a 16 meg total. This worked fine until
I had Nemesis installed. Nemesis at low speed worked fine, but
whenever I would run it at high speed, I would get artifacting in
icons and window sliders, etc, etc,...also whenever I viewed pictures
such as JPEG's/GIFs, it would cause pixel breakup. Some programs
seemed to be unstable as well. Titan Design says that this is a sure
sign that your Ram board isn't keeping up. They recommend a Ram board
that uses 72-pin SIMMs with a speed rating of 60ns... Thats what I'm
goin to, very shortly. :)
From: thechyld@pcc-uky.campus.mci.net (Ronald J. Hall)
A couple of people seemed to have some problems. I used my Gizmo
with Nemesis without problem. We decided it might have been the simm
speed that was in use. I used 4-4mb 60ns Toshiba 8 chip simms.
From: mgrove@.ridgecrest.ca.us (M.Grove)

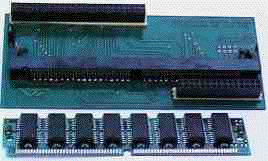
Abbildung 1 - Ram Gizmo Board

Most of Falcon Memoryboards are have a nice Plug & Play
handling
Anybody can fit a new Memoryboard by him self
Watch for the current Board instructions or following the next
five simple steps to fit a new board to your machine
- Step 1
- Switch Power to OFF, remove all current connections Turn your
Falcon with the Keyboardside on a Table Remove the Screws as describe
in Open Case Do not remove the screws for the Floppy device! Dismantle
you Falcon F030 as describe in Open Case
- Step 2
- First, touch the outer GND Rail by an finger tip! Remove the
original Falcon 4 MB Memoryboard while lift the hole board straight
from the mainboard Do not lift the board sidewards
Watch out for static energie!
- Step 3
- Depack your new Memoryboard, save the antistatic material Put the
old board into the antistatic material Insert one or more Simm Modules
with no parity and 60nS as describe in the board instructions 60nS
Modules are needed for ALL Falcon Ram Boards!
A Ram module works only in ONE direction! Also PS2-Modules Watch
for the 'SnapIn' noise of the Simm Module
- Step 4
- Insert the new Board to the Memory Expanisonsport Watch out to
fit it exactly to the Pins from the Mainboard Have a look from all
sides to the Board!! If you found all Mainboard pins are have a
correct direction to the connector of the Memoryboard, press with your
flat hand the hole Memoryboard in the direction thru the Mainboard.
The Memoryboard will slip a half inch in the direction to the
Mainboard, not more!
- Step 5
- Connect the Keyboard, Monitor, and your Mouse to the Falcon Have
a look to the Control Panel 'Systeminfo' after switch on With a Screen
Resolution of 640x400x16 and some .ACCs and Autofolder Software you
must find more as 12421852 Bytes free in your Display.
Remember: 2MB of the 16Mb is waste by the Falcon (MMU) Memory
Logic :/
Switch OFF, remove all Connectors and close the Case as describe
in Open Case


Copyright © Robert Schaffner (support@doitarchive.de)
Letzte Aktualisierung am 23. Dezember 2003
|