| |

Nemesis Accelerator für F030

Die englische Firma Titan Design Ltd hat einen neuen Beschleuniger
auf den Markt gebracht mit dem es möglich ist die Performance der
Atari Falcon F030 Computer auf Trab zu bringen.
Dieser Beschleuniger ist offensichtlich entworfen worden um dem
APEX-Multimedia Serie der gleichen Firma in den erweiterten
Grafikmodis, TrueColor, der Falcons erheblich Beine zu machen.
Nemesis beschleunigt den Falcon Bus auf 24/48 Mhz und
ermöglicht es so z.B einen Falcon unter 640x480 in TrueColor ohne
den berühmten Interlace-Modus recht Fix zu betreiben.
Bei einem eingebauten Expose' Digitizer sollen hier laut
Hersteller bei einer Bildgröße von 256x160 gut 25 Bilder
pro Sekunde möglich sein. Die CPU wird mit Nemesis auf 24Mhz
getaktet und sollte so die Performance ohne grössere Kompromisse
erhöhen können.
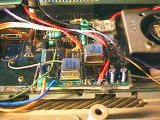
Abbildung 1 - Nemesis Beschleuniger Board, direkt neben dem
Lüfter
Gleichzeitig ermöglich das Board den Falcon internen DSP mit
einem Takt von 48Mhz zu versorgen. Man braucht kaum noch zu
Erwähnen das sich das gerade in APEX, welches den DSP in einigen
Programmfunktionen ausnutzt, sehr stark bemerkbar machen wird.
Ebenso kann eine vorhandene FPU beschleunigt werden.
  Technische Daten der Nemesis-Karte - Takt in Mhz

Device      Normaler Falcon      Nemesis Falcon

 BUS        16                   20 / 24
 CPU        16                   20 / 24
 FPU        16                   20 / 24 oder 40 / 48
 DSP        32                   40 / 48
Laut Hersteller sollte die Nemesis-Karte im dritten Quartal 1996
zu erhalten sein.
Zum Einbau in den Falcon müssen einige Verbindungsleitungen
durch löten Hergestellt werden. Es sollte eine Einbauanleitung in
englischer Sprache dazu geben. Die Anleitung sollte Bilder enthalten.
Bereits registrierte APEX-Benutzer können die Karte zu einem
günstigeren Preis beziehen.
AFTERBURNER/NEMESIS
Gembench results

============================================
AFTERBURNER040 @ 16.5/33/66MHz
Standard Falcon
============================================
Falcon 030 TOS 4.04
AES v3.40
GEMDOS v0.48
MiNT not present
Blitter not present
NVDI 2.51 present
Video Mode: 640*480*2
FPU cookie value=$80000 (68040 internal)
Run and Malloc from FastRAM
Ref: F030 + FPU, 640*480*2
============================================
GEM Dialog Box:             0.770    454%
VDI Text:                   0.200   1700%
VDI Text Effects:           0.410   1826%
VDI Small Text:             0.250   1500%
VDI Graphics:               1.045    835%
GEM Window:                 0.535    261%
Integer Division:           0.910    340%
Float Math:                 0.095    357%
RAM Access:                 0.215   1023%
ROM Access:                 0.220    954%
Blitting:                   0.875    128%
VDI Scroll:                 1.140    231%
Justified Text:             0.920    354%
VDI Enquire:                0.110   1436%
New Dialogs:                0.905    491%
============================================
Graphics:                            837%
CPU:                                 668%
Average:                             792%

============================================
AFTERBURNER040 @ 20/40/80MHz
Nemesis fitted and running with 20MHz bus
============================================
Falcon 030 TOS 4.04
AES v3.40
GEMDOS v0.48
MiNT not present
Blitter not present
NVDI 2.51 present
Video Mode: 640*480*2
FPU cookie value=$80000 (68040 internal)
Run and Malloc from FastRAM
Ref: F030 + FPU, 640*480*2
============================================
GEM Dialog Box:             0.690    507%
VDI Text:                   0.175   1942%
VDI Text Effects:           0.365   2052%
VDI Small Text:             0.225   1666%
VDI Graphics:               0.920    948%
GEM Window:                 0.485    288%
Integer Division:           0.750    413%
Float Math:                 0.080    425%
RAM Access:                 0.180   1222%
ROM Access:                 0.180   1166%
Blitting:                   0.770    145%
VDI Scroll:                 1.030    256%
Justified Text:             0.835    390%
VDI Enquire:                0.095   1663%
New Dialogs:                0.800    556%
============================================
Graphics:                            946%
CPU:                                 806%
Average:                             909%

===============================================================

NEMESIS - VIDEO PERFORMANCE

Falcon with Nemesis at 24/48MHz (24MHz System speed/48MHz DSP & FPU)
- all are non-interlaced resolutions, 16-bit (65,536 colours per screen)
on a standard 14" VGA non-multisync!

Expect far higher resolution modes with a half-decent multi-sync :-)

                 Bus    CPU    Video   Hz
640x480          24     24     24      60
720x528          24     24     24      50

Nemesis also accelerates the FPU and DSP to 48MHz.

============================================

NEMESIS + AFTERBURNER040 - VIDEO PERFORMANCE

Falcon with Afterburner040 and Nemesis - all are non-interlaced
resolutions, 16-bit (65,536 colours per screen) on a standard 14" VGA.

                 Bus    CPU    Pipe   Video   Hz
720x528          12.5   25     50     25      50
640x480          12.5   25     50     25      60
512x400          20     40     80     20      50

Note: Although the Afterburner CPU is being half-clocked in the highest
resolutions, the actual performance is still much higher than a
standard Falcon, and is completely switchable between the various
specifications.
Der eigentliche Einbau
Beim Einbau der Nemesis-Karte sind verschiedene Lötarbeiten
auszuführen.
Das es mehr wie drei Leitungen sind können Sie leicht den
Bildern entnehmen. Die Nemesis-Karte wurde bereits erfolgreich mit dem
Afterburner und auch der Mighty Sonic getestet. Beachten Sie bitte
unbedingt das zum Einbau dieser Karte eine gewisse Erfahrung im Umgang
mit dem Atari Falcon F030 und dessen Hardware eine dringende
Voraussetztung ist. Auch müssen hier leider einige Leiterbahnen
auf der Falconplatine präzise und genau für diesen Umbau
durchtrennt werden. Wichtig ist das Sie hier auch die angegbenen
Punkte auf der Platine korrekt auffinden können. Es darf nicht
tief geschnitten werden unter der Oberfläche befinden sich in
jedem Falcon weitere wichtige Leiterbahnen die nicht zerstört
werden dürfen. Sofern Sie jeden Schritt der englischen
Einbauanleitung Punkt für Punkt befolgen kann eigentlich nichts
falsch werden
Nutzen Sie den Einbauservice wenn Sie sich den Einbau selber nicht
zutrauen!
Die Nemesis Karte ersetzt einige wichtige Taktsignale des Falcon
durch eigene Taktsignale die auf der Karte erzeugt werden. Das kann in
mehreren Stufen passieren. Wichtig ist auf jeden Fall immer das Sie
ein passendes Verhältniss zwischen Bus und CPU-Takt verwenden.
Einigen Sie sich hier besser stets auf gerade Zahlen. Der Falcon kann
jederzeit wieder in den Originalzustand geschaltet werden.
Bisher ist mir leider kein offizieller Einbauservice in
Deutschland bekannt.

Nemesis Falcon System Accelerator Tips & Tricks
Nemesis is designed and developed by Peter Green
with Black Scorpion Software Ltd
Tips und Tricks zum Einbau des Falcon Nemesis-Beschleuniger
- Grounding and Power
- Nemesis will react badly if not supplied wwith a clean power
source
This shoulld be taken froum the smoothing capacitor (V147) near
the internal PSU, but some other locatios are possible
Nemesis allways need a clear ground
Add a thik wire from the negative pole (BLACK WIRE) of the 4700uF
to one or more GND locations on the PCB
These include:
Pin 14 of U20 - the location used as ground for the 150pF
capacitor
Add a ground wire between the negative pole of C147 and the
ground rail of the PCB
- Screen Interferences
- Shorten all long wires at your System
Keep wires from the buffer to DSP, DMA so far as you can from
VIDEL
Try to keep RED, BROWN, YELLOW and ORANGE wires far from Memory,
CPU
- Heating Problem
- The accelerate Falcon is a overheating machine
Do not remove the fan, replace the fan to the top of the internal
PSU
Make sure your machine have a nice air circulation, remove
shilding
The CPU is runs along 50% faster so it must be expected to run
warmer.
However we've had Nemesis accelerated machines running for nearly
a year now without a problem. Providing the fan has been repositioned,
as recommended in our instructions, it should be fine.
Further modification:
It is only comforting for me to put a heatsink on Falcon's CPU.
I always reposition the fan to the top of the metal shield above
the power
supply for all Nemesis installation. Yet there is still a slight
problem, the
slots on the Falcon case are too narrow for warm air to escape
efficiently.
So adding a heatsink is an good extra protection.
It is possible to fit a heatsink with termo glue on the top of the
CPU
- SCSI Trouble
- A easy way to found SCSI/DMA Problems is to use a disk checker
like
TREE_CHK.PRG, it is a part of KOBOLD, or Diamond Edge
Compare copied date after a copy job from disk to disk
Use a lower Nemesis Speed
Fit a 82pF capacitor between U20 Pin 14 and Pin 110 of U36
Fit the 150pF capacitor between U20 Pin 14 and U36 Pin 110
Replace capacitors with and 1K resistor
Desolder the white wire from the buffer, insulate it, remake the
broken
track to Pin 110 of U36
- No Video Output
- Check your machine for solder scraps or fragments befor switch
on!
Check pins of all surface mounted chips
You have set the jumper on the internal expansions port?
White screen without logo: Falcon become clock from buffer, some
other
modification is wrong:
Black scree: Turn the machine off. No clock signal is passing the
buffer
Your system can't run. Check all wires as described in the
manual!!
- IDE Trouble
- Check your machine for solder scraps or fragments befor switch
on!
Recheck the DMA-Buffer wireing. (White wire from Buffer to U36)
Follow the instructions of the read_me file from nemesis disk
Deactive your Blitter while using NVDI
Check the smal capacitor on the nemesis buffer board
If you can't found any mistake, switch nemesis to the lower speed
an check again your IDE-Device. Make sure before you have a backup
before you wrot data to your IDE-Device!
IDE trouble only can fixed with the DMA-Part of Nemesis
A easy way to found IDE/DMA Problems is to use a disk checker like
TREE_CHK.PRG, it is a part of KOBOLD, or Diamond Edge
- Video Trouble
- If you have some flickering or 50% reduced picture re-check all
wires
Re-check the track from VIDEL Pin 73 to the original 25Mhz
Oscillator
This track must be defintive cut!
- Memory unstable
- All is correct, your Falcon work unstable
Check out your memory board. Some older Atari boards dosen't like
the
nemesis high speed. To eleminate that problem is to switch down
into a lower
speed or chance the memory board. Some other third party boards
works also well
Try the WB PS2 Ramkarte, the Gizmo Ram or the Board from Titan
Design
It's not possible to use Simms slower as 60nS on ALL Boards

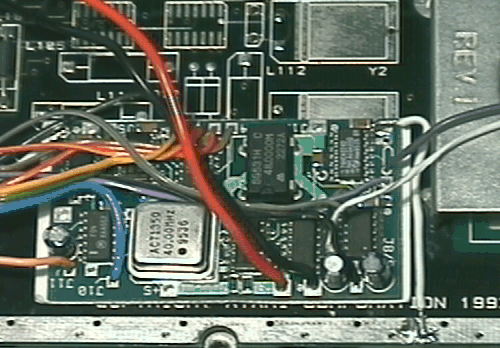
Abbildung 3 - unfitted Nemesis Board
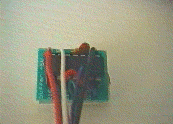
Abbildung 4 - unfitted Nemesis Buffer Board
Here you will found the complete Nemesis wiring as i done by me
self.
No fucking Bugs, that was i found in the manual from 1997! :-)
- Buffer, white cable
-
Connect the white wire to Pin 110 of U36, DMA-Chip
Make sure that the old track is devitive cut as describe in the
manual
- Buffer, blue cable
-
Connect the BLUE wire to the upper Pin of R217
- Buffer, purple cable
-
Connect the PURPLE wire to the upper solder pad of R216
- Buffer, orange cable
-
Connect the ORANGE wire to the upper solder pad of R221
- Buffer, green cable
-
Connect the GREEN wire to the lower solder pad of R222
- Buffer, black cable
-
Connect the BLACK wire to the negative pole of the 4700uF
capacitor (C147)
- Buffer, red cable
-
Connect the RED wire to the positive pole the 4700uF capacitor
(C147)
- Nemesis, purple cable
-
Connect one of the PURPLE wire to Pin 3 & 4 of U52, IKBD Chip
Connect the second PURPLE wire to Pin 3 & 4 of U24, MIDI Chip
Cut and lift Pin 3 & 4 as describe in the nemesis manual
Do it very carfully.
- Nemesis, brown cable
-
Connect the BROWN wire to the lower Pad of R234
- Nemesis, yellow cable
-
Connect the YELLOW wire to Pin 74 of the DSP Chip
Cut track 74 as describe in the manual before you build the new
connection
- Nemesis, grey cable
-
Connect the GREY wire to the right Pin of the removed coil L102
- Nemesis, green cable
-
Connect the GREEN wire to the solder pad of U41 (VIDEL U34)
Cut track 73 before as describe in the manual.
- Nemesis, blue cable
-
Connect the BLUE wire to the cutten track (Pin 73) of the VIDEL
(U34)
Some other modifikations
A new modification with a nemsised Falcon in a Tower Case.
If you are use the RGB/VGA Switch with a Tower Falcon you need to
drill a hole for the RGB/VGA Switch, thats not possible by all cases.
It's a simple thing to solder a two Pin connector with one Pin to the
outer GND rail, the second Pin is the right point for the PINK wire
and the 10K resistor from the right Pin of L107.
Watch out that the second Pin do not touch any other part in your
Falcon!

Picture - a simple plug in RGB/VGA Switch
With that connector you can use the original 'Turbo' or any other
switch from the Tower Front Panel. It's simple to plug in like a
normal PC Board.
Speed Indicators
Authorised NEMESIS Upgrade Services
There are two companies in the UK offering authorised Nemesis
upgrades.
No offical upgrade service in germany avaiable.
FDC Electronics
Penrhyd, Llanrhuddlad
Anglesey LL65 5BG
Tel: 044 01407 730132
MJL Insights
12 Portal Road, Halton
Aylesbury, Bucks HP22 5PR
Tel: 044 01296 622400
Please arrange a suitable date for the Nemesis installation with
them prior to despatching your Falcon. This will ensure that delays
are kept to a minimum.


Copyright © Robert Schaffner (support@doitarchive.de)
Letzte Aktualisierung am 23. Dezember 2003
|